Monday, 2 December 2013
Quick music video made by Premiere Pro.
Tuesday, 19 November 2013
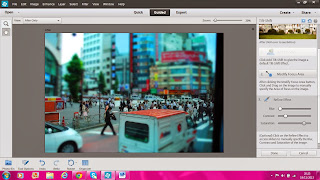
How to tilt shift an image on Photoshop.

1. Go to guided then to tilt shift. Select > add tilt shift.
2. Go to > modify focus area and select the area that you want to be blurred. Then select >refine effect and increase the saturation so that you get a lot of bright colour in your photograph.
3. You should now have a tilt shifted photograph.
How to create a picture stack on Photoshop.
1. Go to guided then to picture stack.
2. Select the number of frames and how thick you want them in your photograph.
3. You should now have a picture stack of your one image.
2. Select the number of frames and how thick you want them in your photograph.
3. You should now have a picture stack of your one image.
How to create a puzzle on Photoshop.
1. First go to guide and select puzzle effect.
2. Select the size of the puzzle piece that you want and then go to > select puzzle piece and select the pieces of puzzle that you want to move around.
3. Once you have done this, go to >extract piece > move tool so that you can move your puzzle piece anywhere you like.
You should now have a puzzle just like this one.
Thursday, 14 November 2013
Project Proposal
Proposal
Concept and project description
What we are going to create
We will be
creating an advert for organic food from a farm called “Tummy Friendly Farm”.
We have chosen to advertise Organic food as we want to raise awareness of the
goodness of organic food and send a message to the audience that organic food
reduces health risks because it has been grown in a nature friendly way on
healthy soil.
In our advert
we also want to show the reasons why eating fast food is unhealthy and poor in
nutrients. As in recent decades fast food has increased dramatically with now
25% of people consuming junk food diets. This is a trend which has resulted in
numerous diseases. We will be showing a deadly zombie disease as a metaphor of
what junk food does inside the body and why organic food is much healthier and why
people should switch to it.
Our target
audience is going to be children and teenagers ages 12-18 as we want to create
awareness of the bad effects of non-organic food and why organic food is the
healthier option. The zombie theme of the advert will be uses as this will
attract children and teenagers attention.
The Plot
Our main
character “Bob” consumes a burger but he doesn’t know that the meat inside the
burger comes from a cow which was diagnosed with an unknown deadly disease.
Later that night,
Bob itches his whole body (but we’re only going to show his hands and his
rotten patch of skin) uncontrollably then transforms into a flesh eating
zombie.
The moral of
the story is that if Bob ate meat that came from an organic farm called “Tummy
Friendly Farm (TFF)”, then he wouldn’t have become a zombie.
Why we are using a zombie theme
We have chosen
to have a zombie theme for our advert because the horror/ zombie theme has
become a trend in many movies and TV programmes. People these days love zombie movies not just
because they make them feel scared but because the zombies symbolise something
in their own lives as in our advert the zombie will symbolise the victim of the
effects of fast food.
Research: The Walking Dead
We looked at
“The walking dead” TV series to help us with our ideas about our advertisement.
In the walking dead everyone gets affected by a virus which turns them into
zombies. This is where we got the idea of having “Bob” turn into a zombie from
getting a disease from fast food. “Bob” will also be the first disease carrier
in our advert who would affect everyone else with the disease which is how many
zombies are formed in “The walking dead” (but we will not be showing other
people turning into zombies because of “Bob”).
Research: World War Z
We
researched “World War Z” which is a movie about a world war between humans and
zombies. We used this as our research as it gave us an idea about the look and
the actions of the zombies which we are going to apply to our character “Bob”.
The way that the zombies are violent in the movie gave us the idea that “Bob”
will also be violent to others when he turns into a zombie.
Main Character
Name: Bob
Physical
appearance: Short, Fat, Bald, Hairy, Wears glasses, Shirt with stains on it and
wears a Clip on tie.
He lives
alone in a studio flat.
Has one
friend named Mike which is a cactus.
Occupation:
Accountant
The meat
from the fast food place (which came from a factory called “Mad MOO Meat”)
diagnosed Bob with a deadly disease which resulted in Bob having zombie
characteristics such as; coughing out blood, limp walking, groaning and eating
raw flesh.
Shot list/storyboard and project
requirements
Scene 1:
First shot:
Blank screen (Black), White font writing of the name of the non-organic company
‘Breaking Bad Cow’.
Sound: Eerie
music
Second shot:
Panning shot of table in the main characters bedroom showing his work uniform,
glasses, calculator (to clarify his job which is an accountant). Bob’s hairy
hands then enter the shot whilst he is reaching for his shirt.
Sound: Voice
over narrating the narrative and eerie soundtrack.
Third shot:
point of view camera angle of Bob reaching for his glasses, they slip through his
fat sweaty hands and as the glasses hit the ground, they break.
Sound: voice
overs, eerie music, dialogue (Bob yelling)
Lighting:
Natural light (morning)
Props for
scene 1: cactus, glasses, uniform (shirt, belt, clip-on-tie), a table, a
calculator, pen, tray and a watch.
Scene 2:
First shot:
panning shot of Bobs legs walking towards a fast food restaurant.
Sound: The
sound of Bobs feet stomping on the ground and eerie music
Second shot:
Point of view camera angle of Bob receiving his meal on a tray on the counter
top of the fast food restaurant.
Third shot:
Point of view shot on the table that Bob is sitting on with his tray.
Fourth shot:
Stop motion of the burger unwrapping itself, revealing the burger.
Fifth shot: point of view shot of Bob holding the burger then him slowly bringing it towards the camera, which represents his mouth. The scene dissolves into a blank screen after that.
Lighting:
Natural light (morning)
Sound: voice over narrative and eerie music.
Props: tray, burger, coffee cup, fries and shoes.
Scene 3:
First shot: this scene will take place in the bathroom, which
will then show a close up of Bob scratching his hands until blood starts to
drip whilst coughing at the same time until blood splatters on his shirt.
Second shot: Birdseye view of the sink. Then some of Bob’s
body parts such as his ear, one eyeball and a patch of skin fall into the sink
covered in blood.
Sounds: Bob itching himself, the sound of blood and body
parts falling off into the sink. [Bob starts growling.]
Props: fake blood, fake ear, fake eye ball, and fake patch of
skin.
Scene 4 (final scene):
First shot: a panning shot of Bob’s legs, limp walking
towards another human being.
[Screen turns blank]
Sound: Eerie soundtrack, Bob growling, Bob’s loud footsteps
on the ground, a scream from the victim that Bob is feasting on.
Props: man shoes
At the end there will be a final message to inform the
audience not to eat non- organic food.
Techniques
Photoshop- to create the logo of our organic company and the
non-organic company.
Stop motion- to unwrap the burger that “Bob” will eat.
Filming- to show the short story of how Bob becomes a zombie.
Time line
19/11/13
|
Find an actor to play the main role of “Bob” in
our advertisement.
|
20- 22/11/13
|
Buy our props (approximately £30) and book the
area we will be filming in.
|
25-29/11/13
|
Begin filming (2nd and 4th
scene) in one of the members houses.
|
2-6/12/13
|
Continue filming in another venue (fast food
restaurant) for the 3rd and 5th scene.
|
9-13/12/13
|
Start editing the production, create sound track.
|
6-10/1/14
|
Create a logo for the two factories which will
feature in our advert by using Photoshop.
|
13 jan-13 feb/ 14
|
Re-do any filming or editing that needs to be done
until completed.
|
March
|
Present our final piece.
|
K1308748
Thursday, 7 November 2013
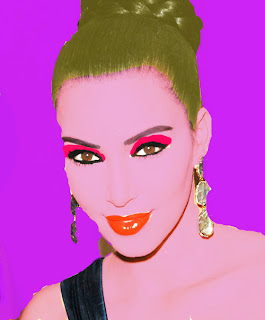
How to create a 3D cartoon on Photoshop.
1. Go to > select brush tool and with this you can select the part which you would like to add colour to.
2. Go to > brightness and contrast and change the tones so that the image looks brighter than usual.
3. Choose a colour of your choice and paste onto the parts of the face that you have selected.
 4. Continue to select and paste the areas on the picture that you choose until you get a final image. Now you have a 3D cartoon image.
2. Go to > brightness and contrast and change the tones so that the image looks brighter than usual.
3. Choose a colour of your choice and paste onto the parts of the face that you have selected.
 4. Continue to select and paste the areas on the picture that you choose until you get a final image. Now you have a 3D cartoon image.
Monday, 28 October 2013
Sunday, 27 October 2013
How to create a cartoon panda using illustrator
1.Firstly, create a round circle using the ellipse tool.
2. Using the ellipse tool create 2 more circles for the ears and then right click > send to back.
3. Create the inner parts of the ears using the ellipse tool then go to gradient and select the colour that you want. Make sure the degrees for the colour is set to 180 degrees in order to give that 3D effect to the ears.
4. Do the same for the outer part of the ears and select the colour you want.
5. Go to gradient and select a blended colour. (here I chose black with white so that it has a 3D effect).
6. Using the ellipse tool create the eyes. use a blended colour of your choice.
7. Create another circle for inside the eyes using the ellipse tool. Go to gradient and choose your colour that you want. Go the the degree sign on the gradient and choose 180 degrees.
8. Using the ellipse tool create 2 more inner circles for the eyes. The inner circle can be an eye colour of you choice but the one behind this must be white.
9. Create black circles using the ellipse tool for the pupil of each eye.
10. Using the ellipse tool create a curved line for the nose. Go to Gradient and choose a black or grey colour.
11. Using the paint brush tool create 2 curved lines coming from the nose in order to create the mouth.
12. Using the rectangle tool create a square around your cartoon. Right click on the square > send to back.
13. Go to gradient and choose any colour you like for the background.
14. Once you have done this you should now have created your cartoon panda (or whatever animal you created).
Saturday, 26 October 2013
How to create a 'Mini planet' on Photoshop.
1. Have prepared a good image of a skyline. Crop a good view of the skyline.
2. Go to Image> resize> Image size. Make the height size the same as the width size
3. Go to Image > 180 degrees in order to flip the image upside down.
4. Go to Filter > distort> polar coordinates. This will turn the photograph into a round shape with the skyline around the edges.
5. Once your image is like this, use the healing brush in order to match up the middle centre of the photograph.
6. Also, use the clone stamp tool to match up the buildings in the top centre.
7. You should have now created your 'mini planet'.
Subscribe to:
Comments (Atom)


